
In the above pic, I have used the rotate icon to flip it 90 degrees so that the image is landscape. If you can't find the rotate icon, you can follow the path 'Arrange; Rotate or Flip; Rotate Left. MAKE SURE THAT THE IMAGE HAS BEEN SELECTED AND THAT YOU HAVE THE WHITE CIRCLES IN EACH CORNER OTHERWISE THIS STAGE WON'T WORK.
I then drag the image so that the top left of it is lined up with the top left of the paper (does that make sense to anyone else???)

Then shrink the image by clicking and dragging on the bottom right hand white circle (It will change to a two headed arrow to illustrate this). Drag it until the right hand side aligns with the right hand side of the page -I usually make it smaller to start with and then drag it out larger as I find it easier to see the alignment. It should look like this:

Print it out using the borderless function of your printer (I have to change my paper type from Normal to Matte to allow me to choose this option).
I wanted a blue and cream card base but only have the white background option for the Pretty Doodles so I printed it onto a piece of cream linen cardstock.

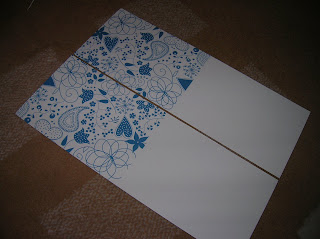
Then simply cut the page in half as shown in the pic and fold
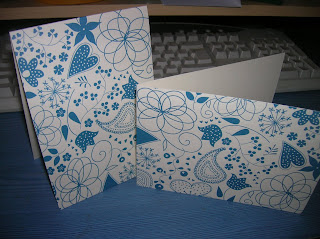
And there we have it - 2 A6 cards which can be used both landscape and portrait and only using 1 piece of A4 card and half the ink of printing a whole page.
I hope you like my first tutorial on here and I hope to make another one to show how I print a single image to create a simple one layer card as in the thank you cards I made a while back.
_____________________________________________
On a different note, can I thank everyone who sent me birthday wishes and all the great cards yesterday. Sorry I didn't manage to get on the computer yesterday but I will try and post a pic of some of the cards soon.
Thank you


8 comments:
Ooh thank you for that Paul, very useful.. glad you had a fab birthday :)
Elaine x
Fab Paul will come in very handy thanks for shareing :)
Mel x
Thanks for that Paul. Can I ask what printer you have? I've an HP one that isn't too goo with card!
xx :0)
Hi Paul
Thanks for the tutorial I do sonething kike this in photoshop.
Thanks for allyour inspiration.
Audrey
A fabulous tutorial Paul, well put together and very informative, thankyou for sharing..
belated birthday wishes too...
hiya paul, thank you for a fab tutorial, will deffo be havin a go and i'll let you know how i get on. looking forward to more.
shell x
ps happy birthday x
A great TUT PAul. Thank you,Will give it a go.Lindax
Great tutorial Paul - I'll have to try this! :) Thanks! x
Post a Comment