

Firstly, you will need:
1 Piece of card for base, cut at 3" wide by 11" long
2 Panels 2.75" by 2.25"
1 Panel 2.75" by 1.75"
SU Oval Punch (I'm using the old style but the new one works exactly the same)
A scoreboard (not essential but makes this very quick)

Score the base card at 1", 2", 4", 4.5", 8" and 8.5"

Fold along each score line.

Punch a hole between the 1" and 2" folds. Line up the sides of the punch with the sides of the card to centralise it. If you don't have a punch, simply use a craft knife to cut out a hole.

Attach Double Sided Tape to the 1 inch wide piece.

Adhere as shown above.
The holder is now complete and ready to decorate.

I've stamped a pattern using my PTI stamps here before attaching to the base.
Attach one of the larger panels to the inside of the lid and the smaller on to the bottom panel of the holder.

Attach the other large panel to the front of the lid. It'll now be 3 pieces of carstock thick and so quite sturdy.
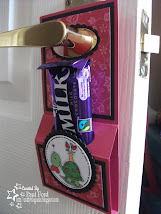
Attach your images/decorations/embellishments how you like. I've used this Bugaboo Mummy image on mine and a typed sentiment cut with the SU Window Punch.

Slide in your treat. I've used a Freddo bar in this one but I'm sure other items would fit too.
Hope you enjoyed the tutorial and maybe tempted to create your own. If you do, let me know so that I can come and see it.
Thank you


12 comments:
I love this Paul, Might just have to pinch this idea for christmas treats, Hope you are well, Hugs Sarah B X
Oh I can't wait to see the xmas one! Such a neat little box! TFS!
Thank you so so much Paul ! I love it ! Can't wait to have a try !!! Smiles from Catherine
You make it look easy, but I know it's not. . .;) Terrific tutorial Paul! :D MWAH!
Such a neat idea.
Thanks, Paul for the great tutorial! Can't wait to try them with something for Christmas!
Hey Paul
Just to let you know that I used your instructions for my latest Aud Sentiments challenge - have credited you for the design!
http://gedalovitch.blogspot.com/2011/01/aud-sentiments-two-words.html
Rx
Thanks for the tutorial!
I gotta make one of these! Thanks for the tutorial.
I love making my own boxes and things. This is really a great idea. Thank you for sharing!
VERY clever and simple thanks.
Wow, I love your gift box idea. Thanks for the tutorial.
Nancy P
mulberrystation.blogspot.com
Post a Comment