Sunday 31 January 2010

Hippy Anya


I made this card for two challenges- Anyone for Anya which was a sketch (have a look below) and Secret Crafter Saturday Challenge (hearts). The colour scheme is based around the DSP from Stampin Up 'Sunny Days' Simply Scrappin Kit - Pink Passion, Old Olive and Tempting Turquoise and Pumpkin Pie. I've used my Cuttlebug Embossing folder to emboss some hearts onto the turquoise panel.

Saturday 30 January 2010

ATC Swappers -Tearing

I was looking at the ATCs I made for this months tearing theme at ATC SWAPPERS that I made a couple of weeks ago and decided I didn't like them and that I'd start again! Anyone else to this sometimes? I wanted to use my GF images and so looked at the Farm Fresh Friday challenge which was monochromatic. You could colour in your image and them only use one colour for your papers/embellishments - obviously I chose GREEN. I made Edward a red head in these my using terracota and red Promarkers - a colour combo that I quite liked the result of and will use again. The papers are Mellow Moss (level 1 pack) from Stampin Up.


Friday 29 January 2010

Anyone for Anya - Heart for Heart's Sake

The theme over at Anyone for Anya is Heart for Heart's Sake. You must include hearts in your work. This digi image was perfect for the theme. Just to show the size of the image, here's a pic of an A5 piece of cardstock with 2 of the images printed.

Here's a close up of the coloured image.


And finally the card. I have used my new Elzybells cardstock for this. The front has been trimmed down the right hand side so that it is shorter than the back so as to show the stamped hearts border (which was stamped with Elzybells ink too).


Thursday 28 January 2010

Quick Elzybells

I needed some quick and simple cards - one male and one female. Needed them to be the same style too which proved a challenge. The Elzybells sheep came to the rescue and here's the result. I know I've sterotyped a bit with the colours but I like them - nothing complicated at all and the sentiments are so nice with this set. Used the Stampin Up Piercing set to add some paper piercing to the corners.


So here's the blue version close up,

and here's the pink.


Saturday 23 January 2010

Secret Crafter Saturday Challenge #67

Yep, I've still been colouring my new images and they're a lot of fun to do so and a second post for today - so unlike me (check out the first post HERE). It's a shame the light has disappeared and I'm having to rely on the flash and it dilutes the colour a bit. Anyway, here's Ebony (a digi download once again)


Challenge 67 over at Secret Crafter Saturday Challenge is a colour combo based on this picture. I've used the cushions as inspiration for the clothes.


The sofa was the inspiration for the brown backing card until I noticed afterwards that it is in fact more of a burgundy colour - I hope my card still counts! There's some brown wood if that counts instead?

Promarkers were used to colour Ebony and the papers are from Stampin Up - Perfect Plum and Old Olive.

My First Greeting Farm Card

I've been wanting to get my hands on some of the Greeting Farm images for a while and yesterday I finally took the plunge and ordered 4 stamps! Then this morning I found out that they also do Digi Stamps - well I tested the water by ordering 2 of them. Well, it was so easy and such value for money that I ordered another 3!!! As soon as I downloaded them, the door bell rang and there was the postman holding a package of stamps that I'd ordered yesterday - so in a space of an hour I went from owning none of these images to owning 9.

I've had a play with two so far - my Edward rubber stamp and my Soccer Anya digi stamp. What I like about the digi stamps is that the size can be altered. I printed two Soccer Anyas onto an A5 piece of card. I think this will be the size I'll use the most. I really like how the brown hair has turned out but can't remember the coulours I used! Using Windows Picture Viewer, I'll be able to print a variety of images easily - whole pages of the same or mixing and matching - how exciting! To show the diference in size between the ones I've been playing with today, I've placed Edward between the two Anyas.

I used the Anya on the left to make this card for the Anyone for Anya? Challenge. The theme was to use Black and White and one other colour. I chose to use RED for mine. The black and white theme goes well with the football too. The card blank is a digi image too from a Cuddly Buddly set I purchased many moons ago.

It's not obvious in the picture above that it's a card so I took a picture from slightly above too to show how it works. Anya is acting as a stand to keep it up.


Seeing as both the image and the card itself are digi images, I thought I'd also use this to apply for the I LOVE DIGI CHALLENGE design team. I originally had a whole other project in mind for that which I may still finish and show here.

Friday 22 January 2010

Elzybells Challenge 35 - Stamped Patterned Paper

Here's my entry for the current Elzybells Challenge. It is too use your own stamped patterned paper. I've created this shaker box as my project (the bow looks so untidy in this pic but I've sorted it now lol).

It opens up to reveal a mini book inside! This is an idea posted by Sarah over at Card Oasis. There's even a tutorial on how to create it too so have a look.

I created two sheets of backing paper for the challenge. I stamped the Elzybells bone using their Whipped Cream ink on Chocolate Chip cardstock and the Elzybells pawprint on some Old Olive cardstock using Chocolate Chip ink. The flash on the camera has made the colours look really bright in the pics.

I've used the dog from the 'Lets Bee Friends' stamp and punched it out and layered it in the same colours. I had so much of the Old Olive left that I decided to line the base of the box with it too.

Tuesday 19 January 2010

Blogger Problems

Is anyone else having blogger problems at the moment? When I'm writing a post, there no options for centralising etc where they normally are and when I put a pic in, the html code appears rather than the pic itself which makes it really awkward. I've tried uploading 4 items below, 3 pics of Thank you cards and one advertising a new challenge blog for digi users.

I've used my Nitwit dogs again and the backgrounds are also from the same set. Have created a very basic quilt effect with four squares and faux stitching.


Check out I LOVE DIGI. It has been set up by Elaine and she is calling out for a design team right now.


Right I'm going to publish this now and see what it looks like! A lot of guess work has been involved here regarding where to type the text etc. Fingers crossed.

Saturday 16 January 2010

My first attempt...

at using my new Stamp-a-ma-jig! I've seen this Trendy Trees set in the Stampin Up catalogue and have been umming an arring for ages because I'd need to get the samj too. So I thought when better to get it than during sale a bration so that I'd get some free goodies too.

These are simple, single layered CAS cards. This one uses Real Red for the trees,

and this one Night of Navy.


I know it's a very simple card with just the stamped images and then Chocolate Chip ink sponged around the edges but I think they look really nice especially on the Kraft Card too. Next step, using the SAB sets!

Wednesday 13 January 2010

Carry All Tutorial

Only just realised that I still haven't put up the tutorial for the Sizzix Carry All boxes! Was going to do it in conjunction with the blog candy! Oops. Anyway, better late than never. I took these pics when I made my Christmas Robin ones so sorry that they are out of season.

Here are the cut pieces using the die. Add tape as shown, then score along score lines.

Attach the two side pieces together.

Add the base pieces as shown.

Tape the side pieces to each other. It should look something like this.

Now fold in the side pieces and tuck under the U shaped flap.

Now fold the other side in and tuck under the other three.

And that's the box made.


To decorate, cut out four panels;
2 x 1 and a half inches by 1 and seven eighths
2 x 1 and a half inches by 3 and five eighths
Decorate then and attach to the box.

And there we go the final product. Hope this is helpful if you won the blog candy or just wanted to see how easy these Sizzix boxes are put together.

If you want to see more Sizzix boxes, just click on the 'Sizzix' label on the left hand side bar.

Tuesday 12 January 2010

Another Shaker Box

I was in need of some ideas on how to use the shaker box die I have from Siizix and thought I'd challenge SARAH over at Card Oasis to make something! How cheeky of me!!! She came up trumps with her project of a mini book within the shaker box itself. It's really worth a look. Well, seeing as I set her a challenge I thought I should have a go myself and decided to add some nestability die cuts onto the lid and base.

I've used Stampin Up Perfect Plum cardstock to create the base and 3 nestability pieces - and managed to get it all from 1 piece of A4 card too. I bet your thinking where the 3rd piece is. Well It is covering the square top of the box underneath the lid part. this gives a nice smooth finish as you can see here.

The nestability pieces were inked with Perfect Plum ink as was the main image piece. The teddy is from Elzybells and coloured with Promarkers. The flowers themselves were coloured with the Perfect Plum ink and a blender pen.

Sunday 10 January 2010

Shaker boxes

Here are a couple of boxes I've made using the Sizzix Shaker Box die. It had a lot of use with the children in school but I hadn't really played with it. These were two quick and simple boxes with just some matting and layering.

All the images are from Elzybells and the papers are Stampin' Up (Rose Red and Pumpkin Pie DSP). I've also used a sentiment from a Level 1 Stamp Set from SU which reads 'Glad we're friends' in white ink. Thought it would be nice to see this after the sweets have been eaten. I took a pic of the box before adding acetate to the windows to avoid the glare! They looked good filled with smarties too.

I got a bit carried away and made a matching notebook for the orange one using the same papers and image.

And on other news, if are also an Elzybells fan then the latest update from there is that Elizabeth has set up a new forum. Check it out at:

Sunday 3 January 2010

Easy Crafts Project #3

Here's my entry for the Easy Crafts Projects Challenge. You probably guessed it would be another sizzix project.
The theme/idea for the challenge was to 'create a card, LO, altered item etc inspired by the following sketch'
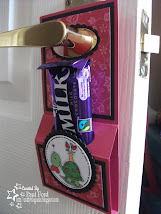
I have followed the sketch to adorn the top of the box. The green card is Certainly Celery with a matching coloured ribbon. When I first put the ribbon on the panel it didn't show up well so I dragged the edges through some Chocolate Chip Ink.

All stamps used are from Elzybells - the paws, dog and sentiment.


Saturday 2 January 2010

Final Winner and More Candy News

Today I will announce the final winner from my Blog Candy Giveaway. The Box Kit goes to


All the blog candy will be in the post ASAP. Hope this snow doesn't delay the parcels arriving with you all. Thanks to all who have entered the candy and spread the word.


If you are still in the mood for some Candy then why not check out Jane's Blog. She is offering 5 lots of Patterned Paper Packs. It closes on the 20th January so go check it out.


Have you also noticed a new addition to my bog? I've added a Chat Window to the side bar. It's looking a bit bare right now :(

Friday 1 January 2010

Blog Candy Up For Grabs

This post will remain on the top until after the
Candy has been given away.
Please check below for newer posts.
________________________________________________________
For all those who regularly follow my blog, you will now that I love using my Sizzix XL dies to create 3D projects. I only really started using them a lot and buying more thanks to Sarah who sent me a couple of die cuts so that I could try before I buy- well what can I say, I was hooked. As a result, I have decided to make some die cut kits myself and give them away as Candy!!! There are 5 sets to give away over 5 consecutive days and I'm calling it my:


That's right, starting on Monday, 28th December, I'm going to draw a name from a hat each day for a week (well weekdays!). To enter, I'd like you to post the above Giveaway banner on your blog with a link to my candy, write a quick post to advertise the giveaway and then comment on this post so that I add your name to the hat - it's as easy as that!
Want to see the kits? Well here goes:

MONDAY
Sizzix Popcorn Box Kit - A Blue and White kit, enough to make 3 popcorn treat boxes. Also includes extra pieces of card and a template to create mats for the sides. (A tutorial on how to put it together will be put on my blog soon)


TUESDAY
Sizzix Popcorn Box Kit - A Pink (although it looks red in the pic, the top right is infact a pright, fuchsia pink) and White kit, enough to make 3 popcorn treat boxes. Also includes extra pieces of card and a template to create mats for the sides. (A tutorial on how to put it together will be put on my blog soon)


WEDNESDAY

Sizzix Carry All Box Kit - A Pink and White kit, enough to make 3 Carry All treat boxes. Also includes extra pieces of card to use as mats for the sides. (A tutorial on how to put it together will be put on my blog soon)


THURSDAY
Sizzix Carry All Kit - A Blue and White kit, enough to make 3 small carry all treat boxes. Also includes extra pieces of card to use as mats for the sides. (A tutorial on how to put it together will be put on my blog soon)

FRIDAY
Sizzix Box #3 Kit - A Pink and White kit, enough to make 2 boxes. Also includes extra pieces of card to use as mats for the sides and the top.


The names of the winners will appear on this post during the week so keep checking back to see if you've won. You only need to comment once and you'll be placed into all 5 draws.

If you'd like some ideas on what to do with these kits, then click on the Sizzix Label in my sidebar and you'll find some.