Friday 30 July 2010

Male Skelekinz Released

Have you seen the Skelekinz range over at Bugaboo? From what I gather, there's been a real 'want' for some male ones too and now they have arrived!


How cool is this little Rock Star? I've created a set of 3 ATCs, each in a different colour. I've matched the jacket to each of the backing card colours.


And have added some of the same colour into the hair. It doesn't look very obvious but I think it does tie in the whole colour scheme with the image.


Like him? Then head on over to the SHOP to see more.The best part of this release is that it's on a FRIDAY which means it's FRIDAY FREEBIE time so you can get your hands on this little rockstar for nothing all this week. Also remember right now, the 50% off sale is on and it ends TOMORROW so be quick and go and look around.

Cathy's Car


Those who follow my blog know how I like Clean And Simple cards and letting the image/sentiments do the talking. When I saw Cute Card Thursday were after TEXT this week I knew Crabby Cathy would be the one to use. The sentiments that come with these images are great. I decided to colour her in in Yellow and Green to go with the No Time To Stamp Challenge.

If you like Cathy (and want to have a look at more images of her) then check out the shop at BUGABOO right now and take advantage of the 50% OFF sale there right now. Come back later today to see some more Bugaboo news regarding the latest release - it's brill!

Thursday 29 July 2010

OBG at Bugaboo

Thursdays are Oldie But Goodie days at Bugaboo's Catch The Bug Blog. This is when the Design Team go back and visit previously released images and give them some needed attention. This week I have used the BBQ Bear from the Butterfly Bear Summer Collection.


I'm going to a BBQ this weekend and have decided to use this image to create a gift to take with me (and some cheesecake too!). This is my first effort. I got these scrummy Dandelion and Burdock Homemade Sugar Pips which ar amazing. I used SU Perfect Plum which matched the sweets well. Made a quick tag with some punches and attached it with ribbon. EASY. But still effective. Looks great IRL. I got the jars from IKEA a long time ago and think I may need to get some more before Christmas! I think that the project is very clean and simple - and so fits in with Just Cute Bears' Clean and Simple Challenge. I know it's not a card but I don't think it can get any easier than two punched shapesstuck together and tied with a ribbon.


If you like this image, or indeed any of the other Bugaboo images, make sure you visit the shop as there is a 50% off sale going on right now - but it ends on Saturday so get shopping quick! Click HERE to visit the shop.

Off now to finish off the jar of sweets - guess they won't be a gift on Saturday then!

Saturday 24 July 2010

Catch The Bug's Summer Challenge

Yep, it's time for another challenge at Catch The Bug, Bugaboo's challenge blog. The theme is
SWEET SUMMERTIME
I have created this mosaic style card using a Beach Monkey image.


Jodie at Bugaboo has so many Summery images for you to be able to use. They are such great value but right now it's even better - THERE'S A 50% OFF SALE happening right now. Just use the code on the site to get this mega discount. Using a Bugaboo image for the challenge entitles you to 2 entries in the draw!

We have our regular Bugaboo Image Prizes to give away plus a $10.00 gift certificate from our Sponsor, The Character Cafe too.

Friday 23 July 2010

Another Door Hanger

Here's another Door Hanger Treat Holder I made for Digital Tuesday's Birthday Challenge. Another turtle from Bugaboo Digi Images. Don't worry, I will play with something else soon (have a BBQ Bear I want to play with). If you like this hanger and want to have a look at my tutorial on how to make it then click HERE.


You might notice that I've actually added an extra panel around the treat itself on this one but I don't think I'll do it again as it looks out of place and breaks up the base colour too much.

Thursday 22 July 2010

Door Hanger Treat Holder Tutorial

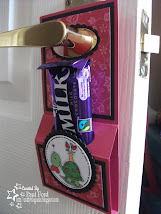
So here's another door hanging treat holder I made (and before anyone asks, yes I will show you a tutorial, in fact it's right underneath this pic ready and waiting!)

I've made this one for Papertake's challenge which is CUTE. I think that the image and the treat holder itself are cute. I've used some Stampin up card in Rose Red with the matching DSP. The image is another Bugaboo Turtle. I really like that the shells match the themes.


But if you've been waiting for the tutorial, here it is (I shall refer to the colours I've used here so that you can follow easier but you can use whatever you want):

What you will need:
1 piece of cardstock for the base cut at 3" by 11"
1 piece of black card cut at 2.75" by 3.25"
1 piece of black card cut at 2.75" by 1.75"
One piece of designer paper cut at 2.5" by 3"
One piece of designer paper ut at 2.5" by 1.5"
One topper (have used nestabilities to cut mine but be creative)
Stampin Up Oval Punch (this is the one I've worked the measurements around. I imagine it's possible to use other but then the measurements may need to be altered)
Double Sided Tape and Glue
A method for scoring (ruler and embossing tool or a scoreboard)

Optional:
Scallop Oval Punch

Firstly, take your base card and score it at 1", 2", 4" and 4.5". You will also note that I've made a light score line at 7.5" too which I will use for lining up later - DO THIS VERY LIGHTLY or use a pencil.

Fold along each score line well and use a bone folder to sharpen the folds (do NOT fold the 7.5" line)

Now take the oval punch and push it as far as it will go from the base of the card. Center it at the sides and punch. The aim is to create a hole between the 1" and 2" scorelines. How's this for an action shot! Just look at the rose red card jumping out!

Punch a whole at the top too. I have done this by eye with the depth, just made sure I've centralised it at the sides so that it hangs straight. Your base should now look like this.

Attach the two black pieces  onto the base as shown above. I attached mine using double sided for strength but when attaching the top one, make sure you put some glue around the oval cut out (just rub some pritt around the outside on the rose red base). If you don't, you may find the layer coming looose around the handle area.

Turn the base card over and align the punch over the hole you created earlier (so that only the black shows - no pink). Punch through.

Do the same again with the designer paper.
Attach double sided tape to the panel as indicated above and stick it down by lining it up with the score line you made at 7.5".
It should now look like this.

Attach your topper to the front. I have created a border for the handle  using the oval punch and then punched a scallop one around it and glued it on.

Now simply add your treat and hang. I've used Dairy Milk for mine but I know Galaxy bars (the caramel ones, my fave) also fit. If you make one and find other fitting treats, please let me know. Originally, I used the SU Window punch but found the hole too small for many treats.

Hope you enjoyed the tutorial, once you've made one, you'll find they are easy to make and great for mass production. I can imagine having these on a stall at a Christmas Fair as they are something a little different.

IF YOU USE MY TUTORIAL, PLEASE LET ME KNOW SO THAT I CAN COME AND VISIT YOU TO SEE WHAT YOU MAKE!

This is my own tutorial and design. I made these treat holders using my own measurements and had to go through many test versions to get the proportions right (I have a bin load of scrapped versions). If you do use it, please show your appreciation by crediting me. Thank You.

Wednesday 21 July 2010

More Turtles Released

Yesterday over at Bugaboo saw the release of a new set called MORE TURTLES. If you haven't seen these yet then take a look - there's a turtle for every occasion. You may have seen me use the Good Luck one the other day with all the lucky clovers on its shell. If not, have a look HERE. There's also a school one, a loved up one, a birthday one and now there's a Christmas one, a Wintery one, a halloween one, an Autumnal one, a beach one... the list goes on.

I have used the Wintery one to create this door hanging treat holder.


I made these with the children at school as an end of year treat activity and they created their own ones by choosing an image, adding their name to the front etc. They also made a matching notebook. They turned out brilliantly but I FORGOT TO TAKE PICS!!! This holder really is easy to make, the thing that took me a while was working out the measurements but know that I know where to score, they can be produced easily. It must be easy as the 7 year olds were able to make them no problem.


When I made this treat holder, I had the 'My Time To Craft' challenge in mind. It is to use check on your project. I'd printed out this Pink Petticoat gingham paper and matched it up with Stampin Up Night of Navy.

Tuesday 20 July 2010

No new card but...

...I wanted to show you this:

I saw Sarah over at Card Oasis working with these Kenny K images as she's on the DT and thought they looked so good with her I went to buy a couple to try. Haven't had time to make a card or project with it yet but was really pleased with the colouring for this. I used so many shades of Prmarkers that I can't remember which I used and so probably will never get the same result again! If you haven't been to Sarah's Blog, then do visit - there's sooo much inspiration there. Hopefully next time, there'll be a card with this KK Image for you to see.

Monday 19 July 2010

Hitting the Beach

This is my second post of the day. My first was my ABaC Project as part of the Bugaboo Design Team - check it out HERE!

I've made two beach themed cards for two different challenges using summer digital images from Bugaboo's Monkey and Frog ranges.


The first one here is the frog one. It's been printed onto white card, coloured with Promarkers and then sponged and inked with SU Soft Suede ink. Simply layered on red then onto some Kraft. All edges have been inked in SS. The sentiments are also from SU. The card was made for the BEE CRAFTY challenge which is 'At The Beach'.


The second card was made in the same way but using a Monkey image. It is for the OUR CREATIVE CORNER challenge which is simply 'Beach'.

Bugaboo ABaC Monday

What's an ABaC? Well it stands for Anything But a Card. Every Monday, a DT Member from Bugaboo's 'Catch the Bug' blog uses Bugaboo images to create something different - and today is my turn!

I have created this little Christmas set with the Rudolph images. I love these images (in case you hadn't guessed yet).


It's a little treat box and a notelet book. The box was made using a Lauren Meader template from Papertrey. This is my first attempt at using it. I usually have a quick practice using some cheaper white cardstock but this time I risked it and printed straight onto my final colour scheme! Luckily it all worked out fine. I really like the shape and the way the lid flap tucks away underneath the base. I can see me using this box quite a bit for small gifts. It's quite a good size and easy to put together.


All the cardstock is SU - Old Olive and Real Red - a great Christmas combo. The papers are also SU and match perfectly. The topper on the box was punched using some of my SU punches.


Here are some closer looks at the two projects.


Sunday 18 July 2010

ATC Catch Up

I spent the day today catching up on my ATC Swaps for the month. ATC Swappers are having a bumper swap right now where the theme is 'Seeing Quadruple'. Make 4 identical ATCs and up to three sets. The first ones I made were the Surfer ones I showed the other day - go check them out! There's an optional 'Summer' Theme too and so I used this great Penguin image from Bugaboo. As well as the ATC Swappers swap, I am entering these into Allsorts' Summer Days challenge.


The third and final set for the ATC Swappers swap are these great froggie ones - again from Bugaboo. I am also entering these into Secret Crafter's Saturday Challenge where the theme is 'Summer Holidays'.


These three ATCs are for the Addicted to ATCs swap where the theme is 'Things With Wings'. This Bugaboo image is a new one and is called Bobblehead Angel. There's a whole collection of Christmassy imagewith these big bobble heads which are so coolnd cute which is why I'm entering them into Cute Card Thursday's 'Get a Head Start' which is a Christmas Challenge.


Hope you like all the ATCs. They are a great way of getting inspirion and seeing other people's work and owning some. So don't be scared if you haven't tried them before, find a swap and join in - it's so much fun!

Sunday 11 July 2010

Trying something I've wanted to for a while...

I've been in awe of Jeanie Witmer, or the Spotted Chick, for months now. She is on the Bugaboo Design Team with me and her colouring is fantastic. She really has the knack for layering elements. One of the things she does that has caught my eye is use Kraft as a base card and layering white on top and then colours. It looks so effective and it's something I've wanted to try for ages but never got around to it... until now! I've combined the Kraft and white with Perfect Plum cardstock and papers from Stampin Up. If it wasn't for Jeanie, then I never would have dreamed of putting those colours together.


Not only have I managed to do something I've wanted to try for ages but I've also incorporated a challenge request. Charisma Cards has the theme 'Watch The Birdie' and want you to incorporate a bird on your card. I've used a Jacobean Bird image from Bugaboo. It's very different to my usual style and wasn't sure if I couild pull it off but I really like how it turned out. Hope you do too.

If you haven't already done so, make sure you visit Jeanie over at her Hen Coup, The Spotted Chick, to see more of her fantastic work.

Shadow Box Card

Here's another Shadow Box I've made for two challenges. Cards for Men were asking for a Christmas card (obviously needs to be suitable for a male) and Secret Crafter were after apertures.

The image is again Rudolph from Bugaboo. He is so going to be my go to image for Christmas. I've made a few projects with him which I will share soon.


I also had an e-mail from Lisa asking how I made the shadow box so I thought I'd share a quick tutorial too. This is simply my way of making these, I'm sure there are other ways on the internet too which you could look at but I think this is a nice, quick and easy method.

To start with, I use a 12x12 piece of card for the base (there's enough here to make 2), an A5 piece of card and my image cut down to 4" by 6".


Firstly I cut a strip off the 12x12 in half and then cut it in half again to make to pieces, both 6" squares. Then I use my scoreboard to score at 0.5", 1", 5" and 5.5". I do this to both.


Fold them like this:

Then, from one piece, I cut out an aperture from the central piece leaving a border (0.5" in my case). Then I take the smaller piece of card and cut it to 4" by 6" and cut an aperture from it by creating a border that is 0.75" from each side. Attach this piece to the inside of the other piece. This not only adds a great effective border but also strengthens the front.


Then colour and attach the image piece to the other piece of the base.


Stick both pieces together by taping down the edges and placing the aperture on top of the image one.


To place inside an envelope (mine fits into an A6 envelope), squeeze the edges in and it will fold flatter.

Hope this makes sense Lisa and that you are able to follow it and have a go. If you use this tut and make a project, let me know as I'd love to see your take on it.

Saturday 10 July 2010

Christmas in July with Bugaboo

IT's BUGABOO CHALLENGE TIME

Our theme this time is Christmas in July.
I haven't made a card this time, instead I've made a set of 6 ATCs. These will either be swapped or maybe even used as toppers on cards, I haven't decided yet.


I have used the Rudolph images from Bugaboo and there's a set of 7 of them. These are some o my fave Bugaboo images and are so (and easy to colour too which is always a plus at Christmas time when there's loads to do).


The colour combo is Soft Suede and Real Red from Stampin Up.


I like them all but I think my fave is this one with the stars. I really like the colouring on the super size bauble but can't remember whic colour Promarkers I used to achieve the shading. I know I repeated the colours on the tree below too.


So why not get into the Christmas spirit and get a head start on those Christmas cards? There's loads of prizes on offer too. Bizzy Becs is offering a $30 Gift Basket to one lucky participant. There's the usual Bugaboo images of your choice up for grabs and also a sponsor this time. And remember, use a Bugaboo digi and you'll earn two entries into the prize draw. So head on over to CATCH THE BUG and get all the details.

I'm also entering these ATCs into Fussy and Fancy's Christmas Challenge,

Digital Tuesday #66

The theme for the current challenge at Digital Tuesday is RED, WHITE and BLUE. I have created this set of ATCs which fit in here and also can be used for a swap. The image is from Bugaboo's A Kids View Summer range.


I'm also using these for my ATC Swap at ATC SWAPPERS as our theme is Seeing Quadruple (making sets of identical ATCs). If you are interested in swapping ATCs then please check us out.


I'm also entering these into Aly's Sunday Challenge which has a theme of Red, White or Blue or you can use a combo of all 3 like I have.

Friday 9 July 2010

Friday Freebie

Bugaboo are releasing two new sets today (along with two new Friday Freebies for you to try). There's a great Butterfly Bear set and a new set ready for Christmas from their A Kid's View range. Here's one of the Nativity images:


Seeing as it is such a great scene in itself, I thought about framing it in a shadow box frame. I took the pic above before glueing it shut so that you can see the whole thing - it was really difficult to get a pic of it all through the window!


So what are you waiting for, head on over to the SHOP and check them out. And tomorrow there'll be details of our latest challenge so make sure you come back and visit.