Saturday 21 February 2009

ATC Swappers - Countryside

This month's theme over at ATC Swappers is 'Countryside'. I've received so many great takes on the theme. There is still time to join in with the February Swap as the closing date is the 6th March this time (as I'm flying off to Greece on Monday and won't be here for the end of Feb). I will set the new theme before I go though. So pop on over to the blog for a look and maybe join in too.

I've used one of my favourite Elzybells stamps for these ATCs. I love the way they are stacked. Obviously the whole stamp doesn't fit on to an ATC but I still think you get the idea. The image is so good, I didn't want to take away from it so I've simply double mounted it onto lime green and black cardstock. What do you think? Is it too simplistic?

Tuesday 17 February 2009

Simple Card Tutorial

As I said, here is another tutorial showing how I print a single Pink Petticoat image on an A5 piece of card to create a very simple card. The great thing about it is that once you've done it the first time and saved it, you can create them quickly when a 'last minute' card is needed. Again I am using Microsoft Publisher to create it.

Firstly open up Publisher and follow the path 'File; Page Setup' choose 'Printer and Paper' option and change paper size to A5 and Landscape. The result should look like this. If you don't have the red and blue border then you'll need to change this by going to 'View; Boundries and Guides'


Next click on the 'Insert Table' icon (highlighted in the above pic) and click and drag
from the top left hand corner to the bottom right of the page. The following table will appear automatically. Choose 1 row and 2 columns and then OK.

Here is what you'll be left with, a greyscale table splitting the page in half. This table does not print and so I simply use it as a guide.


Next I import my pictures. For this Tutorial I'm using the Dad's Taxi set. I went to 'Insert; Picture; From File' and then chose the file I keep it in. As they are A4 in size, it appears huge on the page. If you prefer, you can zoom out here to see the whole page.


Click on the image page and you'll see white circles in each corner. Once this has been done a Picture Toolbar will appear (mine appears at the bottom but sometimes it's a floating one and sometimes it's at the top). Choose the CROP icon (highlighted below).

You will notive that the white circles will have changed to black lines. This tells you that it's ready to be CROPPED.


I then use these black lines to remove the items I don't want which leaves just the starry car. Click anywhere away from the image to remove the crop function.

Click and drag the image to its place. If you want, you can alter the size, rotation etc here. The grey line from the earlier table helps to be able to centralise the image.


You are now ready to print and colour!!!
Hope you found this helpful and that I haven't confused you too much. The best thing to do is to have a go and practice.

Saturday 14 February 2009

WOOOHOOOOOOOOO

(I have two posts for today so be sure to scroll down and check out my first ever Blog Tutorial below)
___________________________________________________________
I'M SO EXCITED!!!!!!!!!

A while ago I posted a pic of some Valentine Gifts I made with Elzybells stamps for a Challenge on the blog. I actually made a matching card at the same time which I didn't post as I was going to enter it into their competition. Well the winners have just been announced and I am one of them - WOOOHOOOOOOOOO


This card has all my trade marks rfol - Promarkers, Inking and Nestabilities. I've used my fiskars punch to create a border strip and mounted it on ripped mulberry paper to make it stand out. What you can't see in the pic is that I've used a Clear Sakura Glaze pen on the flower, top and hearts and over the word 'chocolate'.

So here's the whole set for you to see.

Card Blank Tutorial

I've had a few e-mails asking how I make my card blanks using digi downloads and thought I'd make a quick tutorial on my money saving way. I get 2 A6 Cards out of one page and only print on half the sheet. I use Microsoft Publisher to make them (I am self taught with this programme so if I can work it out, anyone can)


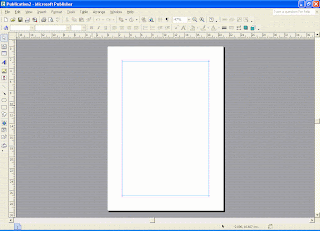
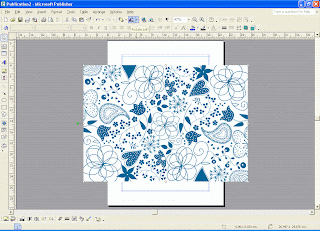
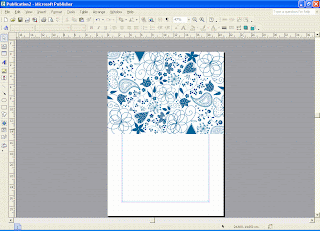
I start by opening a blank A4 page. I then go to 'Insert; Picture; From File' and then go to my Pink Petticoat file and choose the background I want (for this tut, I have chosen Pretty Doodles in Teal):


In the above pic, I have used the rotate icon to flip it 90 degrees so that the image is landscape. If you can't find the rotate icon, you can follow the path 'Arrange; Rotate or Flip; Rotate Left. MAKE SURE THAT THE IMAGE HAS BEEN SELECTED AND THAT YOU HAVE THE WHITE CIRCLES IN EACH CORNER OTHERWISE THIS STAGE WON'T WORK.

I then drag the image so that the top left of it is lined up with the top left of the paper (does that make sense to anyone else???)


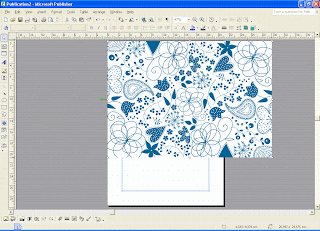
Then shrink the image by clicking and dragging on the bottom right hand white circle (It will change to a two headed arrow to illustrate this). Drag it until the right hand side aligns with the right hand side of the page -I usually make it smaller to start with and then drag it out larger as I find it easier to see the alignment. It should look like this:

Print it out using the borderless function of your printer (I have to change my paper type from Normal to Matte to allow me to choose this option).

I wanted a blue and cream card base but only have the white background option for the Pretty Doodles so I printed it onto a piece of cream linen cardstock.


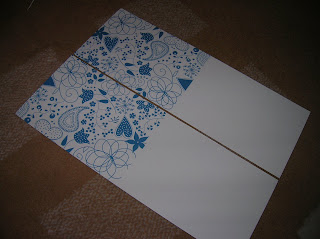
Then simply cut the page in half as shown in the pic and fold


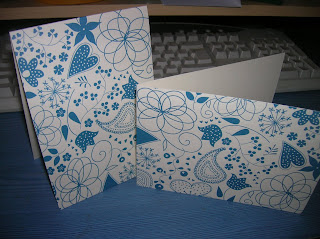
And there we have it - 2 A6 cards which can be used both landscape and portrait and only using 1 piece of A4 card and half the ink of printing a whole page.

I hope you like my first tutorial on here and I hope to make another one to show how I print a single image to create a simple one layer card as in the thank you cards I made a while back.

_____________________________________________

On a different note, can I thank everyone who sent me birthday wishes and all the great cards yesterday. Sorry I didn't manage to get on the computer yesterday but I will try and post a pic of some of the cards soon.

Thank you

Sunday 8 February 2009

Second Update of the Day


Second post today!!! Doesn't happen often. But then again, this is just a very quick card - no nesties, layers, ribbons. I was originally going to make my ATCs for the February 'Countryside' swap over at ATC Swappers Blog today but got distracted. The image is from CC Designs, printed onto cream linen cardstock and was then coloured using my Promarkers. Isn't the monkey just adorable.

Elzybells Challenge 13 - Single Layer


Here goes with my attempt at the Elzybells Challenge - A Single Layer. I really like the idea of simple clean looking cards lately and so enjoyed this challenge, Simply stamped and coloured with Promarkers and finished off with a ribbon (thanks Jocelyn for the tip off with this ribbon tying technique - I've used it in the past but had forgotten about it).

Saturday 7 February 2009

Valentine Teddy

Here's a pic of a card I was going to enter into the Valentine Competition over on the Elzybells blog. I've used one of the new stamps and coloured it with Promarkers. It's been mounted on 2 nestie layers, a circle and a scalloped circle, for double the height. The background is an adapted Pink Petticoat design. I've used gold pen to highlight different areas.

Here's a close up of the image.

Tuesday 3 February 2009

Gossipy Cards

Today, I finally managed to work out how to do borderless printing with my printer!!! I've been wondering how for ages but it never allowed me to tick the option - the answer in the end was to change the paper type to photo paper!!!

So here are two cards I made with my new found skill (lol). I decided to use my Elzybells stamps and here are the results:


I used the Pink Petticoat Pretty Doodles for the background and coloured the image in with Promarkers (YES, my Memento Ink has finally arrived).

Same image and backing paper, but in a different colour. I've added gold detail to areas of the doodles and inked the sides with chalk.
Here's a pic of the card open to see the difference between the back and front.


Monday 2 February 2009

A little help please!

I recently bought this Forever Friends stamp specifically for making a Christeing card. I wanted to make a simple but stylish card but now think it's a bit too plain. What do you think? Any suggestions?

Also, just out of interest, those of you who colour these bears in with Promarkers, which colours do you use?