
I've shared a few Tee-pee cards before and have often been asked for more details. So I have decided to show a tutorial on how I go about it for my tutorial Wednesday as part of the Bugaboo team over at Catch The Bug.

So, you will need:
3 pieces of cardstock (5 and a half inches by 5 and a half, black in this pic)
3 pieces of cardstock (5 inches by 5 inches, the orange pieces)
3 pieces of designer paper (4 and a half by four and a half)
Double sided tape
Score board or ruler and scoring tool

Fold the 3 largest pieces in half diagonally

Cut both of the smaller pieces of card in half diagonally.
Take one of the pieces and cut it into quarters as shown.

Attach to the base pieces as shown.

Turn the base pieces over. Nestle one of the squares into another as shown above. Score a light line for reference to show where it ends.

Attach tape as shown making sure you do not cross over the score line.

Repeat the process with the third piece until you have the above shape.

When you turn it over, it should look like this.

Cut the designer paper in half diagonally.

Attach to the card base.

Attach a small piece of velcro as shown above.

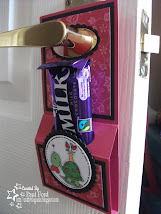
And close the card. It should look like this! Now all you need to do is decorate it as you wish. In the pic I shared at the start, I stamped a PTI sentiment and attached a JJ image which I cut with nestabilities.
Hope you find the tutorial interesting. Hopefully it is interesting enough to maybe make you have a go at creating one. Thanks for looking and let me know if you have a go at it as I love to see how others interpret it.


8 comments:
Thanks for sharing an interesting new fold....and a tutorial on how to do it! Can't wait for time to try this!!
Awesome tutorial Paul! Lookin' forward to giving this a try!!
Hugs & Happy Days!
~Min
Paul, this is such a brilliant tutorial, I'm almost, al-most, brave enough to try it. . .;) MWAH!
Paul , your photos for this easy to follow tutorial are great as a step by step guide . Love your amazing creation .
Shirley-Anne
Paul congratulation.
i just love this style of card. I am always trying to challenge myself with a new type each week. I cant wait to make this up.
TFS
Thanks for sharing this card. I have now made 3 in differetn sizes. one I have done as a christmas tree. It such an inspiring design.
Dear Paul,
I enjoyed the visit on your site. Many thanks for your beautiful inspirations!! How creative and so beautifully done.
Please take a look on my Blogspot.
Hugs from Marina.
This is awesome! You sure have done a great job of sharing how to make this... I am thinking that I need to give this a try. Thanks for sharing. Hugs, Lisa G
Post a Comment