If you would like to get your hands on some of these die cuts and have a go yourself then click HERE to enter my Blog Candy giveaway and be in with a chance to win some.
Here are the pieces needed to create the box.

If you want to stamp straight onto the box then now is the time to do this.
To decorate the outside of the box, stamp onto the side with the tape.
I've actually stamped the inside of the box too just to add to the overall effect.
 Attach the two side panels together as shown.
 Now add the lid part and the base pieces as shown here.
 Attach the side panels together to complete the box portion.
 Turn the box upside down and fold the side panels in
 and tuck them under the 'U' shaped piece.
 Now fold in the final piece and tuck the flap in through the slot.
 Here's what the base should look like - very neat and tidy.
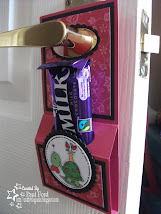
 And there we have it, the completed box ready to be decorated and filled.
 Hope you like it.
Now fold in the final piece and tuck the flap in through the slot. Here's what the base should look like - very neat and tidy.And there we have it, the completed box ready to be decorated and filled.Hope you like it.
EDIT: To answer Angela's query regarding the size, it's:
3 and a half inches tall
Top is 2.5 inches square (well, just over)
Base is 1.75 inches square (again, just over)
If you want to see the size for yourself then enter my blog candy for a chance to win a kit and then you'll be able to see for yourself. Simply click HERE for more details!


2 comments:
This looks a good sized box, if you have time would you add some measurements to your post? I have to admit I haven't used the box I bought, but hoping to do so soon!! Thanks for taking the time to show this fab tutorial,
hugs Angela x
Thanks, they are a useful size, my wish list is growing!!
Merry Christmas, Angela x
Post a Comment