The completed box measures : 3 and a half by 4 and 3 quarters and 2 inches deep.
Firstly cut two pieces of card stock to 12" by 5 and a half" (you can actually get away with 11 and 3 quarters" by 5" if you are careful). Run them both through the machine.
Fold along the score lines (I tend to have the creases facing up and fold towards me along those lines) and attach tape as shown below (I have actually made a mistake in my haste and added tape to the top of both larger pieces - you only need to do this to 1). I recommend strong DST for this.

Next, attach them to make a T shape keeping the tabs on the inside of the completed box.
 Finally attach the box together as shown below:
The box is now ready to be decorated. I attach panels to each side as this dnot only decorates the box but also strengthens it. Below is pic of all the parts:
2 Large Sizzix Die Cuts (brown in the pic)
2 Small Sizzix Die Cuts (brown in the pic)
1 Large Panel for the front (Plain Green Piece)
~ '3 and a quarter' inches by '4 and a half'
2 Long Side Panels (green with stamped paw prints)
~ '4 and a half' inches by '1 and 3 quarter' inches
2 Short Side Panels (green with stamped paw prints)
~ '3 and a quarter inches' by '1 and 3 quarter' inches
1 Image Layer (Stamped with Dog image)
~ 3 and seven eighths' by '4 and an eighth' inches

I have worked out how to get enough panels for 2 boxes out of one A4 piece of cardstock. Here's a cutting sheet to show you how (this is not to scale and shows an A4 piece of card as being the thick black on the outside):

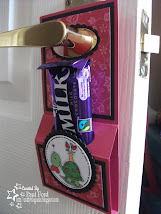
And here's a close up of the finished article:
 As you can see, I've added a ribbon under the first green layer on the cover to act as a 'lever' or 'handle' to lift the lid. If you look at my other boxes, you can see I've used punches to create a gap to use to lift the lid.
Hope this helps and answers any queries you have and that it is useful to some of you in the future!


8 comments:
fab tutoral Paul, I'd been wondering how those work. Do you have to have a Big Shot for them?
Love the finished box, beautifully decorated
Victoria
x
Thanks for the tutorial Paul. Do you think the dies wold fit in the Cuttlebug?
Jane
x
Wow! Great tutorial Paul!
Hugs,
Mélanie
Hi Paul,
Thanks so much for the box components you sent me and all the stamped images. It was very thoughtful of you. I have made the box up and will be posting it on my Blog on Monday.
Thanks again.
Jane
x
Hi Paul,
This turned out great! Always nice to see a fellow male crafter around. :) I found your blog via Irina's (I took a Copics class with her). Question about this... which template is it? Would I find it in the SU catalog or someplace else? Thanks much!
Lovely boxes, does the die cut both pieces? I may have to get this one.
Dear Paul,
Thank you for the tutorial. Have just made the box up and I am ready to decorate it.
Love the little box and I shall have to find some templates to make more.
Hugs, Mette
Hi Paul, Have made mine up tonight, (Eventually!!!) Will take a few pictures of it in the am and email you, will also pop them on my blog with a mention about the candy you will be doing. Hope you have a fabby Chrimbo. Love Hazelxo
Post a Comment