Showing posts with label Stampin Up. Show all posts

Monday, 2 April 2012

Mini Milk Carton


I can't believe Easter is nearly here. This year is flying by! Here I have used my Stampin Up Mini Milk Carton die to make a Creme Egg holder (I do love them although not had as many this year as I usually do!)


A creme egg is a perfect fit. I've used a Bugaboo rabbit digi for the front. It's called Funny Bunny Egg Tower


I'm entering this box into the following challenges:
Make It Monday ~ Anything Goes     Come And Get It ~ Spring
Gingerloft ~ Anything But A Card     Panpastel ~ Easter
Paper Sundaes ~ Easter     Cupcake Inspiration ~ Photo Inspiration
Crafty Catz ~ Use a digi     Patties' Creation ~ Anything Goes

Saturday, 13 November 2010

World Kindness Day Challenge

Did you know that today is 'World Kindness Day'?  Well, to mark the occasion, that is the theme for this week's challenge at Bugaboo. We want you to think kindness, friendship, gratitude, encouragement, congratulations...   There is also a sketch to follow which can be seen on CATCH THE BUG (where the rest of the details can be found too)

I needed to get a move on with my Christmas cards and chose one of these fairly new images from the A Kids View Winter range as I think it depicts friendship nicely. Nothing better than a snowball fight with friends in the snowy season.


The backing panels were made using my snowflake wheel from SU and Night of Navy ink to match the cardstock.


The inside carries on the friendship theme with this SU stamp and their snowflake flurries stamp. All again in Night of Navy

So fancy joining in the challenge? We have the usual 7, 4 and 2 digis of your choice to give away so head on over to CATCH THE BUG to see the rest of the inspiration from the DT and the rest of the details.

I'm entering this card into the following challenges:
BEE CRAFTY ~ Use a digi to create a Christmas card
SWEET STAMPIN ~ Snowflakes
2Sisters ~ Christmas

Wednesday, 8 September 2010

Another Christmas JJ - and still no clothes!

The other day I showed you a Christmas Card using the JJ All Wrapped Up image from Bugaboo. If you didn't see it, have a look HERE. I said I was going to try and recreate it using non traditional colours and here it is:


I've used some SU papers and Tempting Turquoise card here. I was originally going to use the same layout but decided to put her on an angle at the last minute. I liked it and went to stand it up and I had stuck her on upside down! Argh. I had to rip her and the sentiment off the front and restick them but rotating the original layout 180 degrees. I don't think it turned out too badly in the end! Happy accident maybe! Even decorated the inside too with some of the scraps. The sentiment is from my new Papertrey set.

Tomorrow I'll be back to showing some more Halloween projects which will showcase some of the items that I'm offering as Blog Candy HERE right now. Please check it out!

Saturday, 28 August 2010

Secret Crafter Saturday Challenge - Make a start on Christmas


I was working on this card yesterday and finished it off this morning when I saw that Secret Crafter's challenge this week is to make a start on Christmas. This is such a fun image! It's from the JJ range (she can be found in the Christmas Cheer set and is called Wrapped Up) from Bugaboo. I think it strikes the right balance of being a bit 'cheeky' without going too far.


All the papers and card are from SU - Choc Chip, Real Red and Old Olive. I also used my SU stamp and punches for the sentiment. I think this image is so versatile because you could use any colour for the ribbon - think I may try a turquoise Christmas card next just to see! Wonder if it'll work?

Friday, 27 August 2010

Play Day!

I haven't got a card or project to you. Do you ever just have a play day? Just play around with things with no intentions? Well that's what I had today! I made a quick card yesterday which I shared here on my blog but today was experimenting day. This week I got my Papertrey order and a Stampin Up one and so just messed around all day. So now I have plenty of embellishment etc to use up.


I've been having a play with creating backing papers using my A Little Argyle set. I have 4 ATC cards ready to decorate now.


I hadn't really noticed this damask type star in the PTI set until I opened my SU Christmas backing papers and spotted the Garden Green one and thought they were a great match. What do you think?


I bought this great sentiment set that has loads of handwritten style wishes. I stamped a load to see which would fit in my oval punch. The answer - LOADS! I'm all sorted for Christmas sentiments now!


And I had to make a few more cars using the die and stamp set. Really liking the Rich Razzleberry colour right now.

Well back to play. Wonder what'll happen next?

Also, being a Friday today, it's time for a FRIDAY FREEBIE over in the Bugaboo shop. There's a new set of images out today - none other than STELLA. They're a sewing themed set and best of all, you can pick one up for FREE today! Go on, go and have look.

Thursday, 12 August 2010

Leaving Card

Tonight I'm going to a leaving dinner for a friend who is moving to Germany. Wanted something clean and simple (and quick!). Had decided to use the Stampin Up Trendy Trees set as I made some small little ones when I first had the set and liked them. Paired them up with a SU sentiment too which sums up the reason for the card. I couldn't believe it when I saw that Cute Card Thursday had the theme of TREE-mendous! One scary coincidence!


Have teamed up Kraft card with Plum card from SU. Have edged the Kraft with chocolate chip ink and used the choc chip for the stems and sentiment too.


Hope I've managed to hit 'sophisticated and elegant' without being dull and boring!

Tuesday, 10 August 2010

My Time To Craft Challenge


FARM FEVER is the theme for this week at My Time To Craft. I have used the Bugaboo sheep image which actually comes in the Nativity set from the A KIDS VIEW series. I have created a small little note card from scraps of card and paper I had left over from another project that I'm working on - it's unfinished and so not posted yet! The sentiment on the outside was added using Wordart on the computer.


The image has been repeatedly monted on nestie cut outs. The paper and card is from SU in Tempting Turquoise. The sentiment on the inside is a SU stamp stamped using Tempting Turquoise (which has also been sponged around the border of the white.


And in other news, today is the first NEW RELEASE at Bugaboo since Jodie has moved (we had a break last week whilst she did all the heavy hauling!). Today's release is a set of fantastic TEDDY BEARS. Head on over HERE to have a look at them all - they're sure to be a hit. There are male and female ones which is always a bonus. Here's a glimpse of one in her Rose Hat

Sunday, 8 August 2010

Kenny K Challenge 5

I really enjoyed making the card for last week's Kenny K Challenge and wanted to participate again. The theme this time is 'In the Summertime'. A total opposite to last weeks dark side theme. This was actually the first KK image I bought as I knew I was going to use it for my cousin's birthday card at the end of August. She is at that awkward teen stage and when I saw this image I knew it was the one for her.


I used a very summery yellow colour scheme. The designer paper is from SU. I like the I-Pod and I've coloured it to match her pink one - is there nothing better than walking out in the sunshine listening to your favourite music? The thing is with these images is that they are so detailed and so the card itself can be kept quite simple in style and layout as the image can do all the talking.


The summerness of the card means it can also be entered into these challenges:
Incy Wincy - Summer Fun
One Stop Craft Challenge - Summer Fun
Stamps R Us - Digi Image
Bunny Zoe's Crafts - Summer Days
Creative Card Crew - Cute and Girly
Cute Card Thursday - Whateva! (This seemed to be my cousin's favourite answer when younger so it fits in well)

Thursday, 22 July 2010

Door Hanger Treat Holder Tutorial

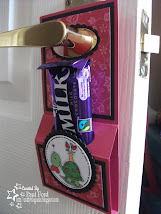
So here's another door hanging treat holder I made (and before anyone asks, yes I will show you a tutorial, in fact it's right underneath this pic ready and waiting!)

I've made this one for Papertake's challenge which is CUTE. I think that the image and the treat holder itself are cute. I've used some Stampin up card in Rose Red with the matching DSP. The image is another Bugaboo Turtle. I really like that the shells match the themes.


But if you've been waiting for the tutorial, here it is (I shall refer to the colours I've used here so that you can follow easier but you can use whatever you want):

What you will need:
1 piece of cardstock for the base cut at 3" by 11"
1 piece of black card cut at 2.75" by 3.25"
1 piece of black card cut at 2.75" by 1.75"
One piece of designer paper cut at 2.5" by 3"
One piece of designer paper ut at 2.5" by 1.5"
One topper (have used nestabilities to cut mine but be creative)
Stampin Up Oval Punch (this is the one I've worked the measurements around. I imagine it's possible to use other but then the measurements may need to be altered)
Double Sided Tape and Glue
A method for scoring (ruler and embossing tool or a scoreboard)

Optional:
Scallop Oval Punch

Firstly, take your base card and score it at 1", 2", 4" and 4.5". You will also note that I've made a light score line at 7.5" too which I will use for lining up later - DO THIS VERY LIGHTLY or use a pencil.

Fold along each score line well and use a bone folder to sharpen the folds (do NOT fold the 7.5" line)

Now take the oval punch and push it as far as it will go from the base of the card. Center it at the sides and punch. The aim is to create a hole between the 1" and 2" scorelines. How's this for an action shot! Just look at the rose red card jumping out!

Punch a whole at the top too. I have done this by eye with the depth, just made sure I've centralised it at the sides so that it hangs straight. Your base should now look like this.

Attach the two black pieces  onto the base as shown above. I attached mine using double sided for strength but when attaching the top one, make sure you put some glue around the oval cut out (just rub some pritt around the outside on the rose red base). If you don't, you may find the layer coming looose around the handle area.

Turn the base card over and align the punch over the hole you created earlier (so that only the black shows - no pink). Punch through.

Do the same again with the designer paper.
Attach double sided tape to the panel as indicated above and stick it down by lining it up with the score line you made at 7.5".
It should now look like this.

Attach your topper to the front. I have created a border for the handle  using the oval punch and then punched a scallop one around it and glued it on.

Now simply add your treat and hang. I've used Dairy Milk for mine but I know Galaxy bars (the caramel ones, my fave) also fit. If you make one and find other fitting treats, please let me know. Originally, I used the SU Window punch but found the hole too small for many treats.

Hope you enjoyed the tutorial, once you've made one, you'll find they are easy to make and great for mass production. I can imagine having these on a stall at a Christmas Fair as they are something a little different.

IF YOU USE MY TUTORIAL, PLEASE LET ME KNOW SO THAT I CAN COME AND VISIT YOU TO SEE WHAT YOU MAKE!

This is my own tutorial and design. I made these treat holders using my own measurements and had to go through many test versions to get the proportions right (I have a bin load of scrapped versions). If you do use it, please show your appreciation by crediting me. Thank You.

Monday, 19 July 2010

Hitting the Beach

This is my second post of the day. My first was my ABaC Project as part of the Bugaboo Design Team - check it out HERE!

I've made two beach themed cards for two different challenges using summer digital images from Bugaboo's Monkey and Frog ranges.


The first one here is the frog one. It's been printed onto white card, coloured with Promarkers and then sponged and inked with SU Soft Suede ink. Simply layered on red then onto some Kraft. All edges have been inked in SS. The sentiments are also from SU. The card was made for the BEE CRAFTY challenge which is 'At The Beach'.


The second card was made in the same way but using a Monkey image. It is for the OUR CREATIVE CORNER challenge which is simply 'Beach'.

Bugaboo ABaC Monday

What's an ABaC? Well it stands for Anything But a Card. Every Monday, a DT Member from Bugaboo's 'Catch the Bug' blog uses Bugaboo images to create something different - and today is my turn!

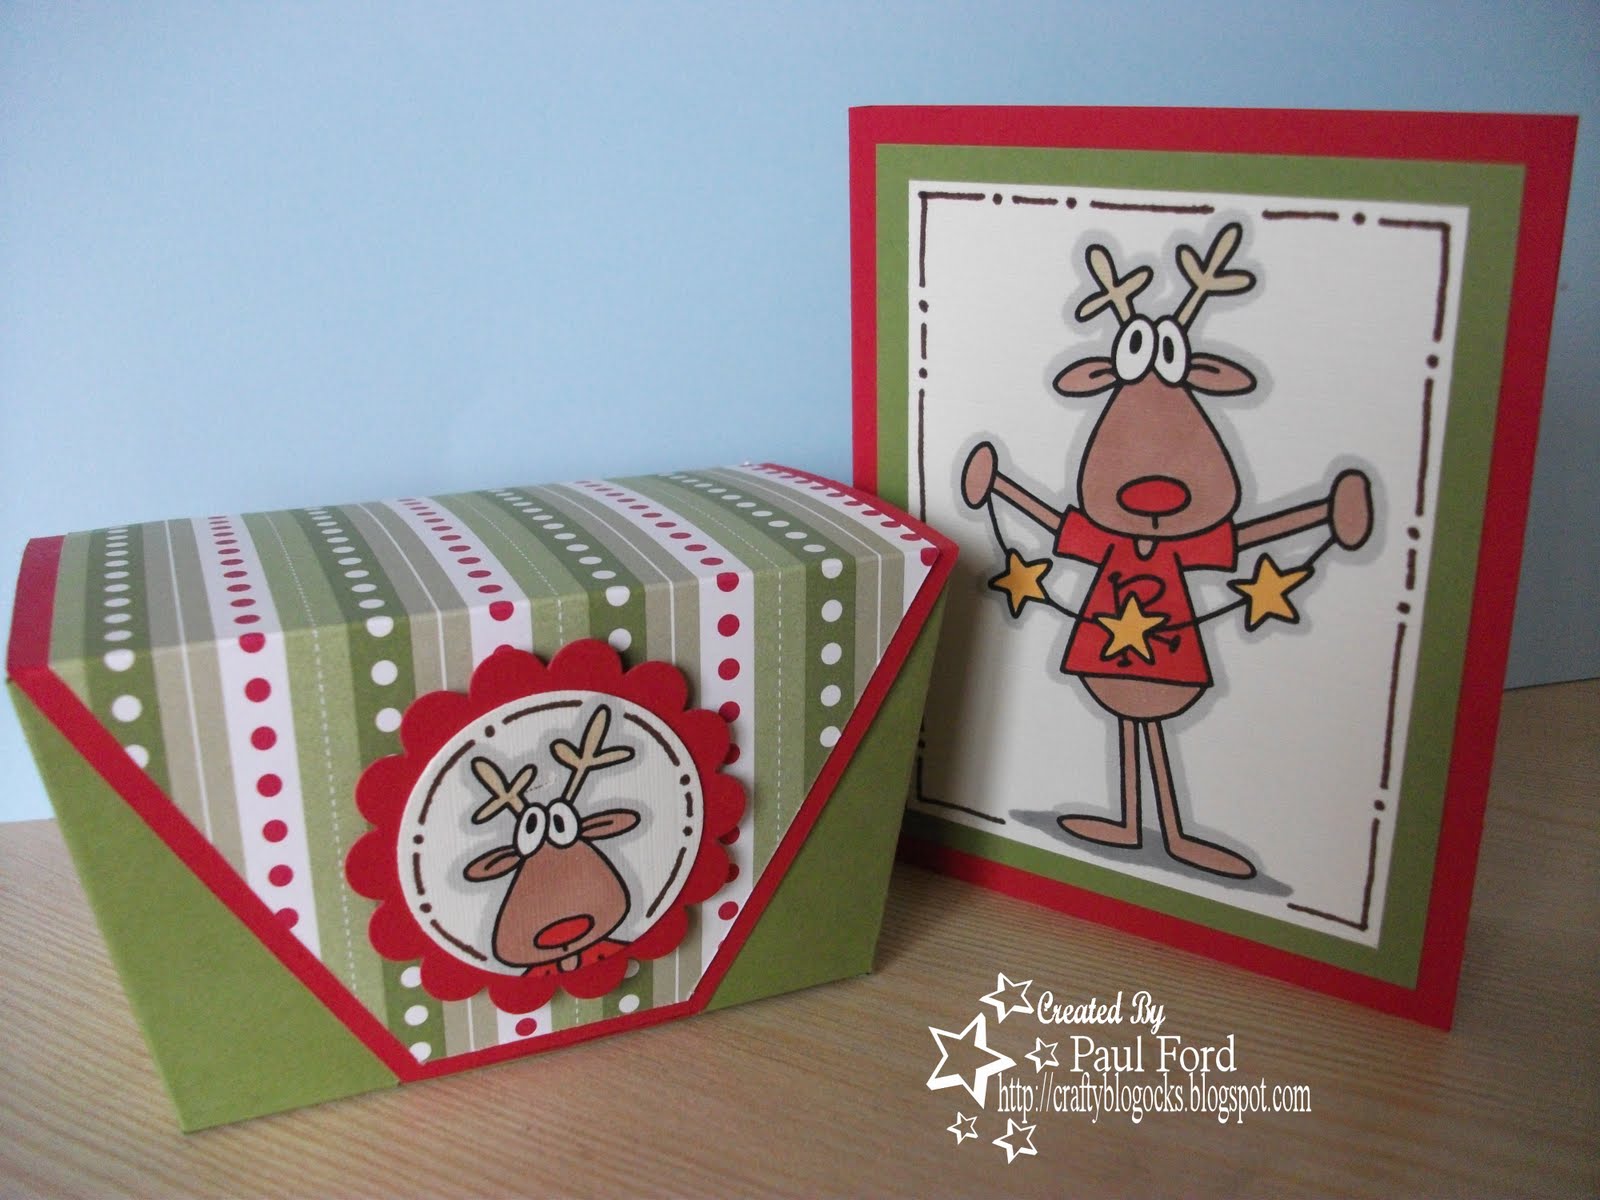
I have created this little Christmas set with the Rudolph images. I love these images (in case you hadn't guessed yet).


It's a little treat box and a notelet book. The box was made using a Lauren Meader template from Papertrey. This is my first attempt at using it. I usually have a quick practice using some cheaper white cardstock but this time I risked it and printed straight onto my final colour scheme! Luckily it all worked out fine. I really like the shape and the way the lid flap tucks away underneath the base. I can see me using this box quite a bit for small gifts. It's quite a good size and easy to put together.


All the cardstock is SU - Old Olive and Real Red - a great Christmas combo. The papers are also SU and match perfectly. The topper on the box was punched using some of my SU punches.


Here are some closer looks at the two projects.


Sunday, 14 March 2010

Triptych ATC Swap

Here are the ATCs I made for the Feb swap at ATC Swappers. Our theme was Triptych. The cars are from a Pink Petticoat set I've had for ages.

I do like my Old Olive. Once again, I've used the papers and coloured the cars with Marsh Green Promarker to match.

Our next theme is a colour challenge, either 'Red and Black', 'Yellow and Black' or BOTH!!! Why not hop on over and maybe join in with the fun.

Wednesday, 10 March 2010

Sarah's New Tutorial

Have you seen Sarah's new tutorial over at CARD OASIS? No, then why not - it's AMAZING!!! She has released it in time for Mother's Day so it could be a perfect solution. Here's my attempt at it. It looks really complicated but the step by step instructions take you through it nicely.

I've used my nesties to make a 'catch' for the front flaps. I used some Elzybells sheep to decorate the panels. When it opens out, there are three compartments to store things.

The colour choice is a brown from Papermill and Old Olive card and papers from Stampin Up. I think you can really go to town with decorating these. I've kept it quite simple as I was so eager to put it together to see how it looks that I didn't decorate anything first. You never know, I may add more decoration to it.

Thursday, 18 February 2010

Anyone for Anya - Flower Power

With a theme like FLOWER POWER, what else could I use except Hippy Anya!!! The card is for this weeks Anyone for Anya challenge. Last time I used this image, I made a really bright and bold card with loads of colours so this time I decided to keep it clean and simple. The paper is from SU but I've forgotten which set oops! I coloured Anya in to match.

Both the sentiments are from Elzybells. The white card is a linen textured card which looks great in real life but the camera hasn't picked up on it which is a shame.


Sunday, 31 January 2010

Hippy Anya


I made this card for two challenges- Anyone for Anya which was a sketch (have a look below) and Secret Crafter Saturday Challenge (hearts). The colour scheme is based around the DSP from Stampin Up 'Sunny Days' Simply Scrappin Kit - Pink Passion, Old Olive and Tempting Turquoise and Pumpkin Pie. I've used my Cuttlebug Embossing folder to emboss some hearts onto the turquoise panel.

Saturday, 30 January 2010

ATC Swappers -Tearing

I was looking at the ATCs I made for this months tearing theme at ATC SWAPPERS that I made a couple of weeks ago and decided I didn't like them and that I'd start again! Anyone else to this sometimes? I wanted to use my GF images and so looked at the Farm Fresh Friday challenge which was monochromatic. You could colour in your image and them only use one colour for your papers/embellishments - obviously I chose GREEN. I made Edward a red head in these my using terracota and red Promarkers - a colour combo that I quite liked the result of and will use again. The papers are Mellow Moss (level 1 pack) from Stampin Up.


Thursday, 28 January 2010

Quick Elzybells

I needed some quick and simple cards - one male and one female. Needed them to be the same style too which proved a challenge. The Elzybells sheep came to the rescue and here's the result. I know I've sterotyped a bit with the colours but I like them - nothing complicated at all and the sentiments are so nice with this set. Used the Stampin Up Piercing set to add some paper piercing to the corners.


So here's the blue version close up,

and here's the pink.


Saturday, 23 January 2010

Secret Crafter Saturday Challenge #67

Yep, I've still been colouring my new images and they're a lot of fun to do so and a second post for today - so unlike me (check out the first post HERE). It's a shame the light has disappeared and I'm having to rely on the flash and it dilutes the colour a bit. Anyway, here's Ebony (a digi download once again)


Challenge 67 over at Secret Crafter Saturday Challenge is a colour combo based on this picture. I've used the cushions as inspiration for the clothes.


The sofa was the inspiration for the brown backing card until I noticed afterwards that it is in fact more of a burgundy colour - I hope my card still counts! There's some brown wood if that counts instead?

Promarkers were used to colour Ebony and the papers are from Stampin Up - Perfect Plum and Old Olive.