Showing posts with label Elzybells. Show all posts

Friday, 24 September 2010

Halloween Bobbleheads' Awesome Release

I can't begin to tell you how long I've been waiting to share the latest release from Bugaboo with you!
These are certainly some of the best Halloween images I've ever seen. They are from the Bobblehead range (a Christmas set has also been released). As it's Friday, there's a FRIDAY FREEBIE available. The Frankenstein's Monster is up for grabs.


I decided to use him to get ahead with my ATCs for ATC Swappers as next month is a Halloween theme. I was going to create a set of 4 with just him but then got carried away and printed off more images and these were the result:


Here's Dracula:

And a Mummy:

And finally a Ghost:

There's also a Witch, Princess and a Little Devil in the set to enjoy. The background was stamped with an Elzybells web stamp onto Pumpkin Pie cardstock. The sentiment was simply typed under the image before printing (the joys of working with digital images). Head on over to Bugaboo and check them out and pick up the freebie but please remember that all effort is put into the images being up in time but sometimes a delay may occur, just keep checking back and they will be there (they usually go up between 5pm - 6pm British time). While you're over there, check out the Monthly Club - in September you can get 20 images for $20 - that's about 60-70p each in our money! How cool is that?

If you like Halloween images and treat holders, make sure you check out my blog candy HERE. As it is nearing the end of the month and the draw will take place soon, I'm going to allow entries by simply commenting on the post - no need to copy the image and post on your own blogs - SIMPLY ONE COMMENT COULD WIN YOU LOADS OF THINGS!

I'm going to also enter these ATCs into Gingerloft's Happy Haunting Challenge. This is a new challenge to me and probably most people as this is only their second challenge.

Monday, 6 September 2010

More Treat Holders


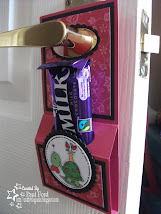
I made an adaptation of my Door Hanger treat holder by bringing the back over as a flap for a challenge a few weeks ago for Bugaboo. I've had another go at these. It's slightly different this time (the measurements are easier to remember).


Again I've used the Goofy Ghosts from Bugaboo. I have this digi set up for grabs as part of my blog candy HERE. Go check it out. The backing panels have been made using Elzybells stamps. As you can see in the pic above, a Dairy Milk Freddo bar fits perfectly.

Wednesday, 1 September 2010

More Treat Hangers


You knew I wouldn't be able to create some Halloween Door Hangers! If you like these then they are SOOOO EASY to make. If you don't believe me then just check out the tutorial I created by looking at the link on the right of my blog or by clicking HERE.

I created the backing panels by stamping a web stamp and sentiment from Elzybells repeatedly onto some coloured card. I like the fact that the ghosts (Goofy Ghosts digi images available from Bugaboo) have these bow ties as it means they can be co-ordinated with any colour. Yesterday I had them in Blue and Red, today they are in Orange and Green.


Currently I have some blog candy running and all the items to recreate these will be included (along with other items too) so to be in with a chance of winning, make sure you have a look HERE.

Tuesday, 31 August 2010

Goofy Ghosts Unleashed


Today is the day that the GOOFY GHOSTS set get unleashed released over at Bugaboo. I fell in love with this image as soon as I saw it. He's going to be great for Halloween gifts! I have used my sizzix XL die to create these goody bags:


I used the bags with scallops die to make the die cuts but cut off the scallop lid. I think the scallop is what has put me off using this die so much as I found it harder to decorate. Not a probelm anymore. The backing panels have been stamped with a web stamp from Elzybells and then embossed with clear embossing powder to give a subtle look. The sentiment has been printed on the computer and then punched and layered.


Now the other day I mention I got a hold of a load of metal clips at a really good price to use on a project. I needed one but have over thirty. I said I didn't know what to do with them. Well I found an answer! Not only do they keep these bags shut but they look good too.

If you like these then make sure you have a look HERE to enter my blog candy. The items needed to create these are included in the prize.

I'm also entering these into 2 Challenges:
Cupcake Craft Challenge ~ Lets Get Digital (digi Ghost image)
The Shabby Tea Room ~ Old Meets New (my old XL die meets the new Bugaboo Images)

Wednesday, 10 March 2010

Sarah's New Tutorial

Have you seen Sarah's new tutorial over at CARD OASIS? No, then why not - it's AMAZING!!! She has released it in time for Mother's Day so it could be a perfect solution. Here's my attempt at it. It looks really complicated but the step by step instructions take you through it nicely.

I've used my nesties to make a 'catch' for the front flaps. I used some Elzybells sheep to decorate the panels. When it opens out, there are three compartments to store things.

The colour choice is a brown from Papermill and Old Olive card and papers from Stampin Up. I think you can really go to town with decorating these. I've kept it quite simple as I was so eager to put it together to see how it looks that I didn't decorate anything first. You never know, I may add more decoration to it.

Friday, 19 February 2010

2 in 1

This card was made for the Elzybells Challenge and Secret Crafter Saturday Challenge. Both have the same theme which is to have more than 1 fold. I made a gatefold card using the Elzybells sheep. I love that the sentiment runs from front to inside and that the images complement each other with 3 sheep in each - they are in fact from two different Elzybells sets.

The colour scheme is Old Olive and Chocolate Chip from Stampin Up. The image is coloured with Promarkers - I found that Marsh Green complements Old Olive wonderfully.

It wouldn't be me without a bit of doodling!!!

Hope you like the card and also, did you know it is now even easier to play along with the Elzybells Challenges by posting directly on the EVERYTHING ELZYBELLS FORUM? The forum is also a great place to get inspiration and all the latest Elzybeels gossip and chat to other Elzy fans - go ahead, visit it and sign up!!!

Saturday, 13 February 2010

Elzybells Challenge 36 - Valentine Treat

Here's my make for the latest Elzybells Challenge which is to make a Valentine Treat. I used my Sizzix Carry All die and Kraft card for the base. All the images (the girl, hearts and sentiment) come from one set - Sweet Like Chocolate. I used my Chocolate brownie and Strawberry fool ink for the first time too. The buttons I've placed around the base are what I won last week. I chose Chocolate Chip buttons and they are great. There's a huge variety in the pack - hearts, flowers, large circular, small circular.

And here it is, overflowing with sweets. I chose some brown, red and pink ones out of a box of Quality Streets to match the theme (the rest are working their way into my tummy)

My prize was a refill pack so they came in a bag rather than the jar but luckily I had bought these little jars in IKEA a long time ago and they are perfect. I punched a scallop circle out of the label that was included and stuck this to the lid so that I know which colour they are.

Friday, 29 January 2010

Anyone for Anya - Heart for Heart's Sake

The theme over at Anyone for Anya is Heart for Heart's Sake. You must include hearts in your work. This digi image was perfect for the theme. Just to show the size of the image, here's a pic of an A5 piece of cardstock with 2 of the images printed.

Here's a close up of the coloured image.


And finally the card. I have used my new Elzybells cardstock for this. The front has been trimmed down the right hand side so that it is shorter than the back so as to show the stamped hearts border (which was stamped with Elzybells ink too).


Thursday, 28 January 2010

Quick Elzybells

I needed some quick and simple cards - one male and one female. Needed them to be the same style too which proved a challenge. The Elzybells sheep came to the rescue and here's the result. I know I've sterotyped a bit with the colours but I like them - nothing complicated at all and the sentiments are so nice with this set. Used the Stampin Up Piercing set to add some paper piercing to the corners.


So here's the blue version close up,

and here's the pink.


Friday, 22 January 2010

Elzybells Challenge 35 - Stamped Patterned Paper

Here's my entry for the current Elzybells Challenge. It is too use your own stamped patterned paper. I've created this shaker box as my project (the bow looks so untidy in this pic but I've sorted it now lol).

It opens up to reveal a mini book inside! This is an idea posted by Sarah over at Card Oasis. There's even a tutorial on how to create it too so have a look.

I created two sheets of backing paper for the challenge. I stamped the Elzybells bone using their Whipped Cream ink on Chocolate Chip cardstock and the Elzybells pawprint on some Old Olive cardstock using Chocolate Chip ink. The flash on the camera has made the colours look really bright in the pics.

I've used the dog from the 'Lets Bee Friends' stamp and punched it out and layered it in the same colours. I had so much of the Old Olive left that I decided to line the base of the box with it too.

Wednesday, 13 January 2010

Carry All Tutorial

Only just realised that I still haven't put up the tutorial for the Sizzix Carry All boxes! Was going to do it in conjunction with the blog candy! Oops. Anyway, better late than never. I took these pics when I made my Christmas Robin ones so sorry that they are out of season.

Here are the cut pieces using the die. Add tape as shown, then score along score lines.

Attach the two side pieces together.

Add the base pieces as shown.

Tape the side pieces to each other. It should look something like this.

Now fold in the side pieces and tuck under the U shaped flap.

Now fold the other side in and tuck under the other three.

And that's the box made.


To decorate, cut out four panels;
2 x 1 and a half inches by 1 and seven eighths
2 x 1 and a half inches by 3 and five eighths
Decorate then and attach to the box.

And there we go the final product. Hope this is helpful if you won the blog candy or just wanted to see how easy these Sizzix boxes are put together.

If you want to see more Sizzix boxes, just click on the 'Sizzix' label on the left hand side bar.

Tuesday, 12 January 2010

Another Shaker Box

I was in need of some ideas on how to use the shaker box die I have from Siizix and thought I'd challenge SARAH over at Card Oasis to make something! How cheeky of me!!! She came up trumps with her project of a mini book within the shaker box itself. It's really worth a look. Well, seeing as I set her a challenge I thought I should have a go myself and decided to add some nestability die cuts onto the lid and base.

I've used Stampin Up Perfect Plum cardstock to create the base and 3 nestability pieces - and managed to get it all from 1 piece of A4 card too. I bet your thinking where the 3rd piece is. Well It is covering the square top of the box underneath the lid part. this gives a nice smooth finish as you can see here.

The nestability pieces were inked with Perfect Plum ink as was the main image piece. The teddy is from Elzybells and coloured with Promarkers. The flowers themselves were coloured with the Perfect Plum ink and a blender pen.

Sunday, 10 January 2010

Shaker boxes

Here are a couple of boxes I've made using the Sizzix Shaker Box die. It had a lot of use with the children in school but I hadn't really played with it. These were two quick and simple boxes with just some matting and layering.

All the images are from Elzybells and the papers are Stampin' Up (Rose Red and Pumpkin Pie DSP). I've also used a sentiment from a Level 1 Stamp Set from SU which reads 'Glad we're friends' in white ink. Thought it would be nice to see this after the sweets have been eaten. I took a pic of the box before adding acetate to the windows to avoid the glare! They looked good filled with smarties too.

I got a bit carried away and made a matching notebook for the orange one using the same papers and image.

And on other news, if are also an Elzybells fan then the latest update from there is that Elizabeth has set up a new forum. Check it out at:

Sunday, 3 January 2010

Easy Crafts Project #3

Here's my entry for the Easy Crafts Projects Challenge. You probably guessed it would be another sizzix project.
The theme/idea for the challenge was to 'create a card, LO, altered item etc inspired by the following sketch'
I have followed the sketch to adorn the top of the box. The green card is Certainly Celery with a matching coloured ribbon. When I first put the ribbon on the panel it didn't show up well so I dragged the edges through some Chocolate Chip Ink.


All stamps used are from Elzybells - the paws, dog and sentiment.